Thrilled to share that my little baby cookie blog turns THREE YEARS OLD TODAY! Three years, three hundred and thirty cookie posts published… Would love if you pay me a visit (click here)


Thrilled to share that my little baby cookie blog turns THREE YEARS OLD TODAY! Three years, three hundred and thirty cookie posts published… Would love if you pay me a visit (click here)
I consider this a work in progress, but for a first time using this technique, I am happy with it. You can use pretty much any formula you like, but go for a minimum of 500g total flour, as you will be removing 150g of dough to make the lattice. To cut the lattice, consider getting this gadget. You can always try to cut it by hand, but I imagine that would be quite tricky… at least for me!
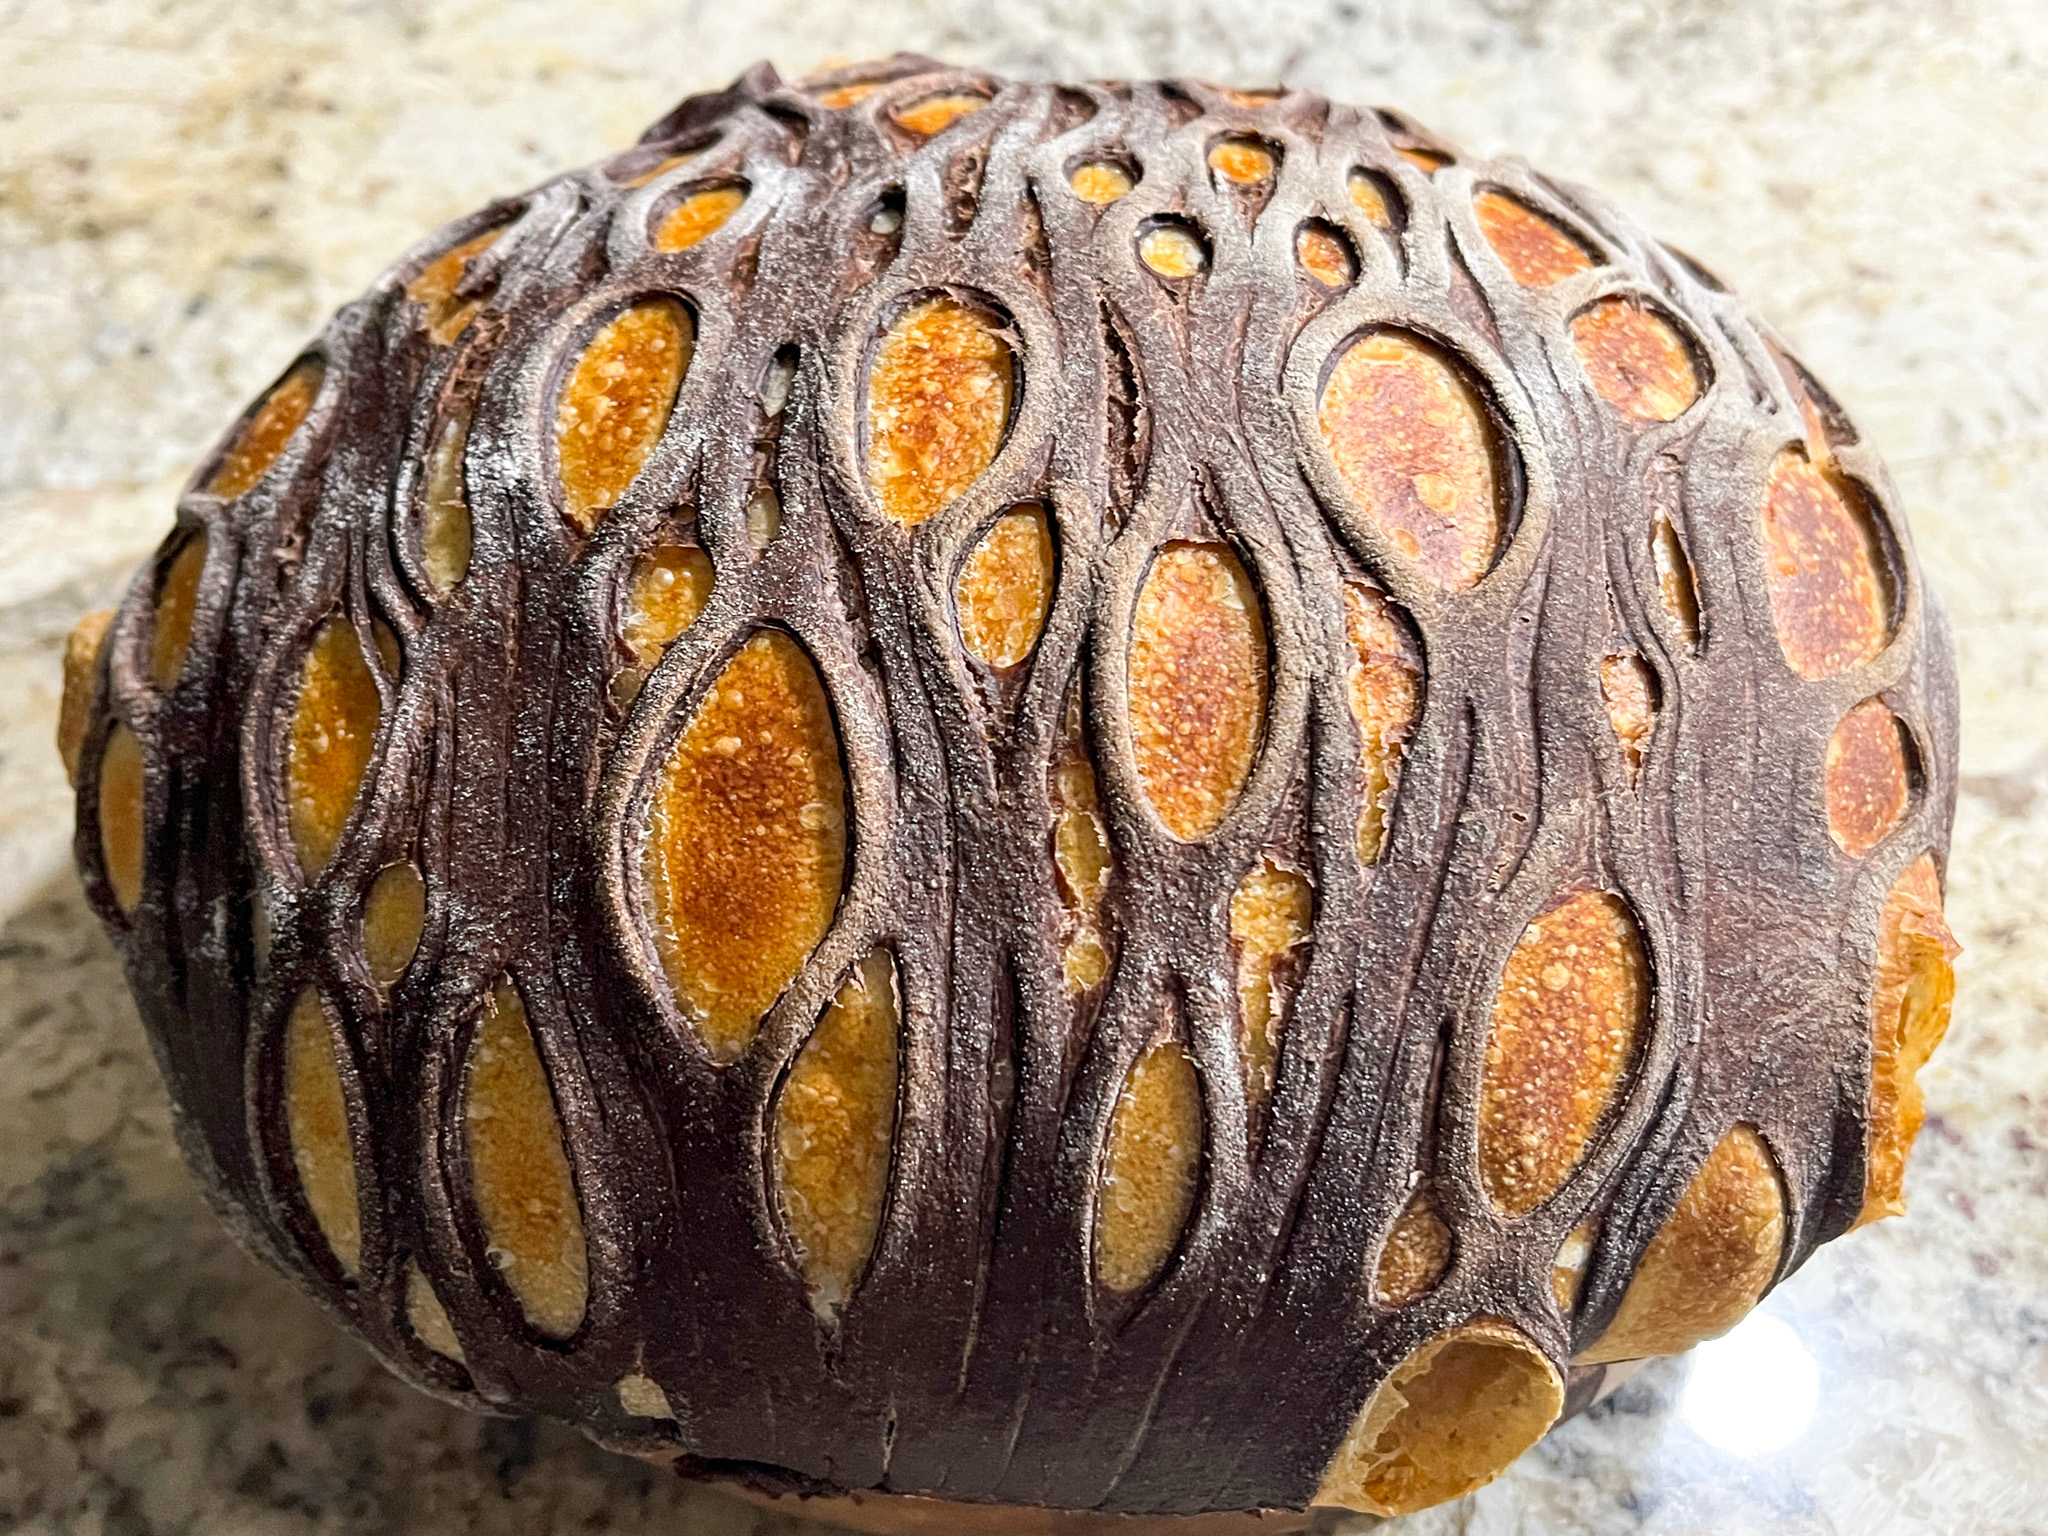
COCOA LATTICE SOURDOUGH
(from The Bewitching Kitchen)
400g white bread flour
150g whole wheat
80g sourdough starter at 100% hydration
9 g salt
360g water (I had to add flour as I mixed the dough, it was too sticky)
30g cocoa powder (see comments about it in the method description)
After mixing the dough in the Kitchen Aid for 4 to 5 minutes as I normally do, I went through a series of folding/kneading at 45 minutes intervals for a total of 5 cycles. At that point, I removed 150g of the dough and added the cocoa powder, kneading it into the dough, as best as I could. Not all the amount was incorporated, but the dough was dark enough.
The main dough was shaped as a boule and placed in the fridge overnight. The dark, smaller portion was covered with plastic wrap and also placed in the fridge. Next morning the dark dough was rolled as thinly as possible and cut with the pie lattice gadget. That was carefully placed on top of the main dough right before baking. Keep in mind that the moment the lattice touches the dough you won’t be able to move it and adjust it.
The bread was baked at 450F for 30 minutes covered, and 15 minutes without a lid. Slice after completely cool.
ENJOY!
to print the recipe, click here
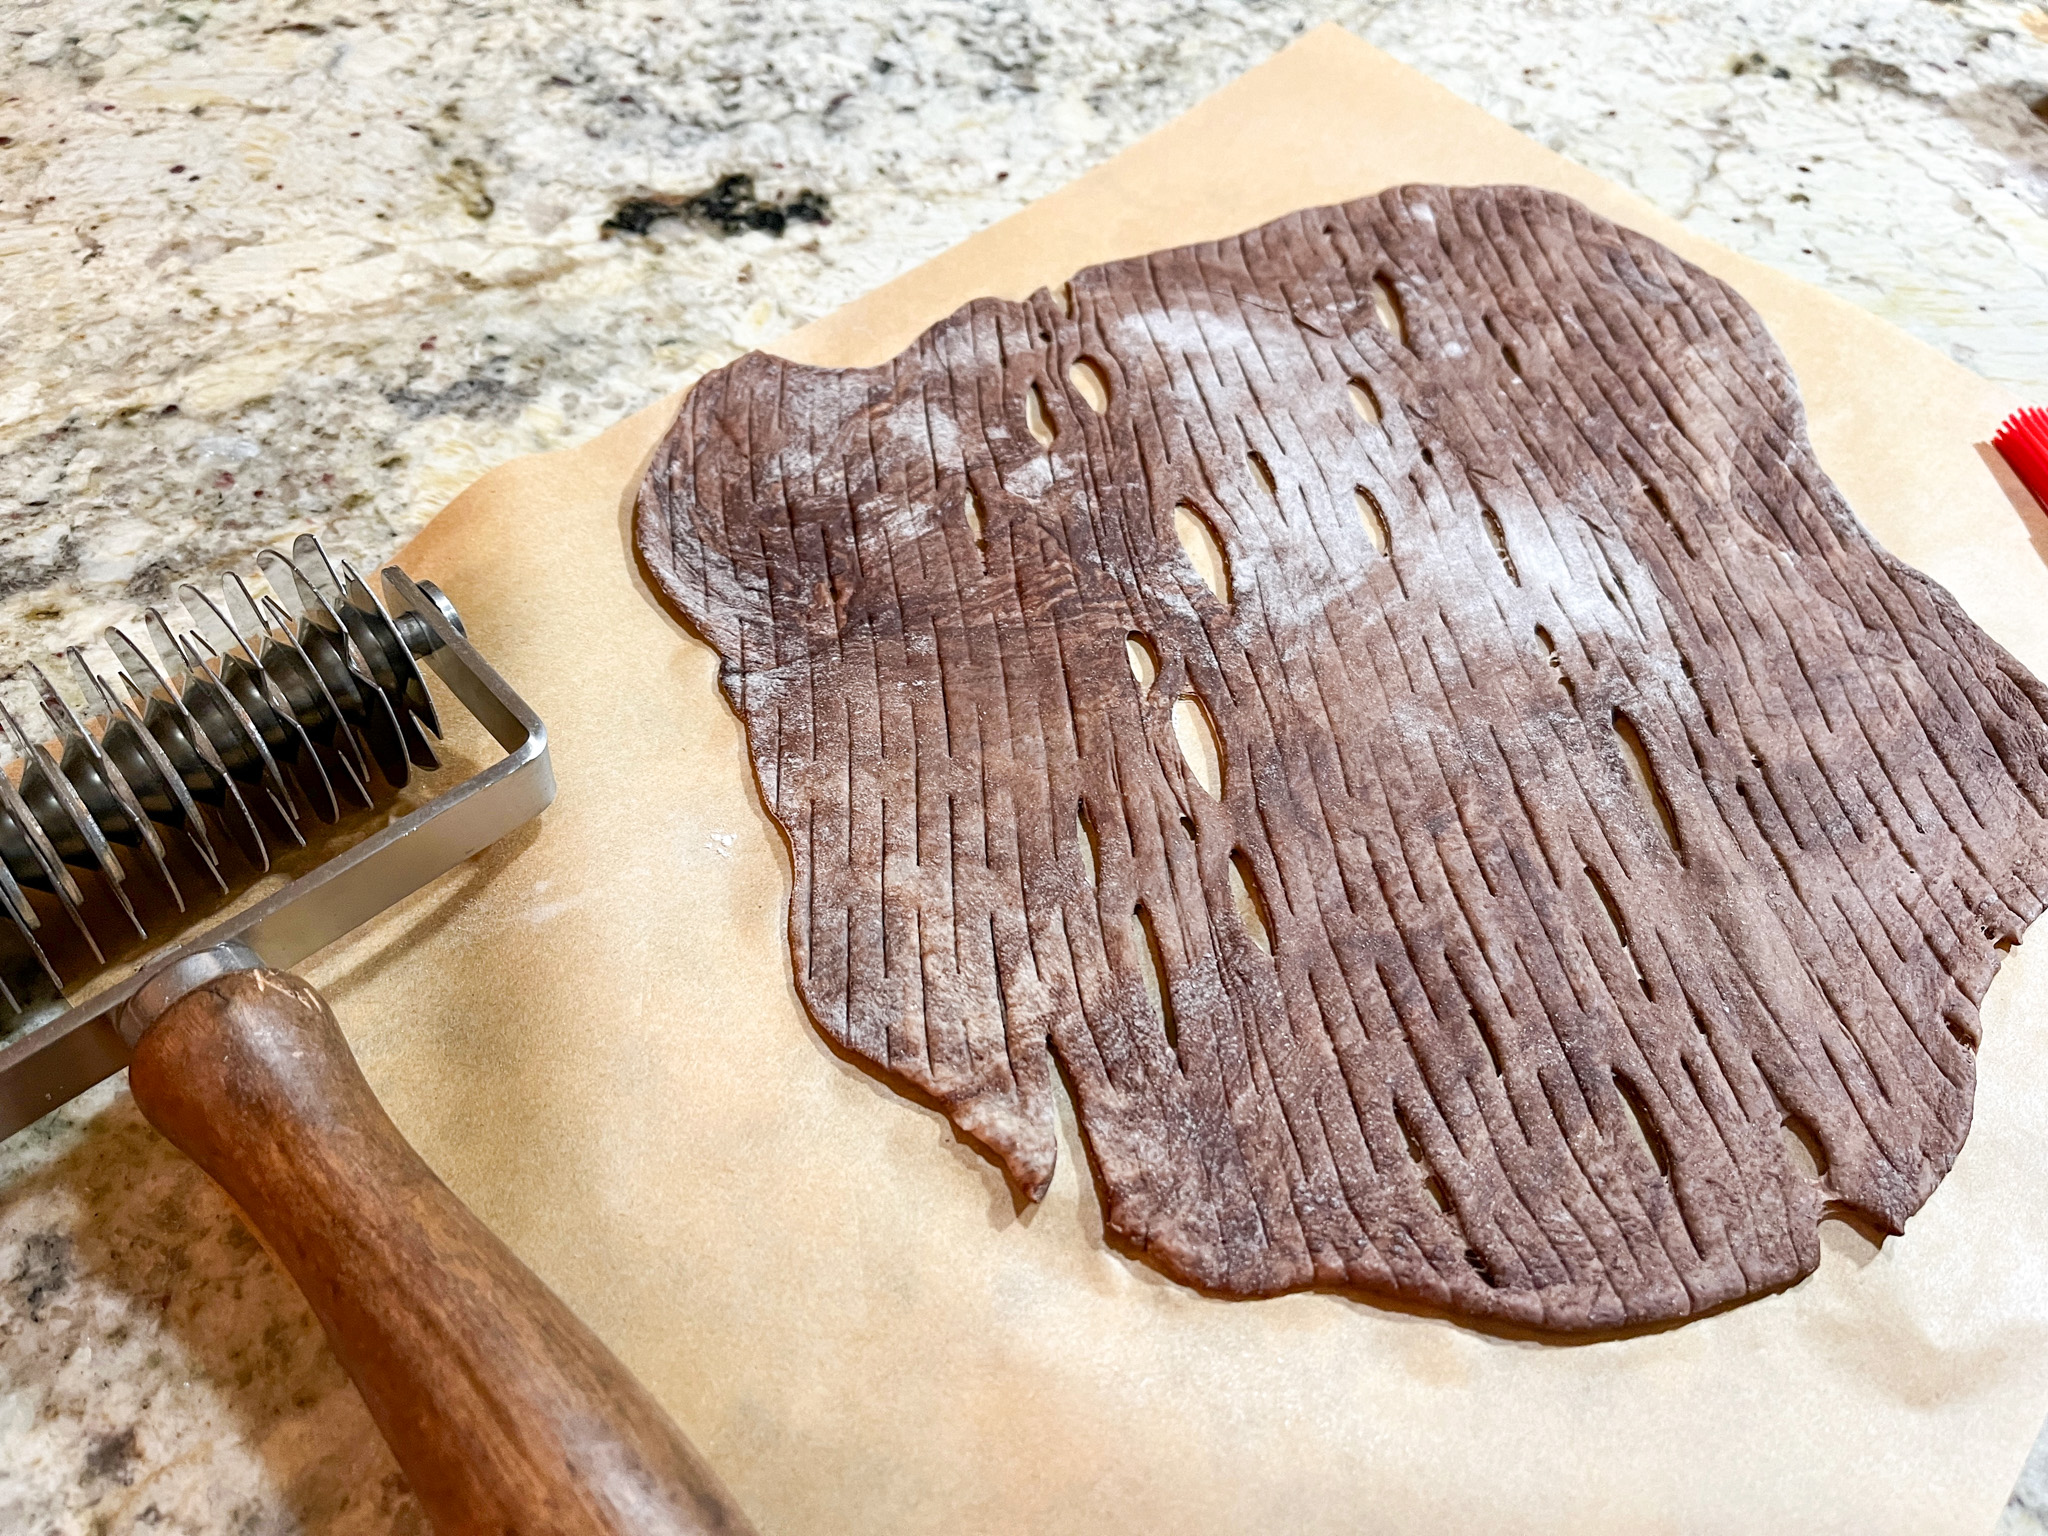
Comments: The picture above was my first attempt at rolling the lattice, and it was too thick, it barely opened at some parts. So I gathered that dough and rolled it again. Try to go as thinly as possible, which was not very easy, the gluten tends to put up a fight. I definitely want to do it again, using other colors, but mainly making sure to roll the lattice thinner. Wish me luck! Why don’t you try it also and let me know how it goes for you? 😉

We did not detect any particular cocoa taste on the bread. The dark part gets a different texture, almost like a cracker. We both loved it… Stay tuned for more lattice adventures in the bread world!
.
ONE YEAR AGO: Pistachio Sugar Cookies, the Uzbek Way
TWO YEARS AGO: Carrots and Zucchini Stir-Fry with Peanut Sauce
THREE YEARS AGO: Cookie Therapy, Anyone?
FOUR YEARS AGO: The Quasi-Vegan Quiche
FIVE YEARS AGO: Not Quite Moqueca
SIX YEARS AGO: Roasted Butternut Squash with Cashew Nuts
SEVEN YEARS AGO: Mississippi Roast and the Open Mind
EIGHT YEARS AGO: Walnut-Raisin Bran Muffins
NINE YEARS AGO: A Star is Born!
TEN YEARS AGO: Chestnut Flour Sourdough Bread
ELEVEN YEARS AGO: Kinpira Gobo and Japanese Home Cooking
TWELVE YEARS AGO: Walnut Sourdough
THIRTEEN YEARS AGO: Thai Chicken Curry
FOURTEEN YEARS AGO: Zen and the art of risotto
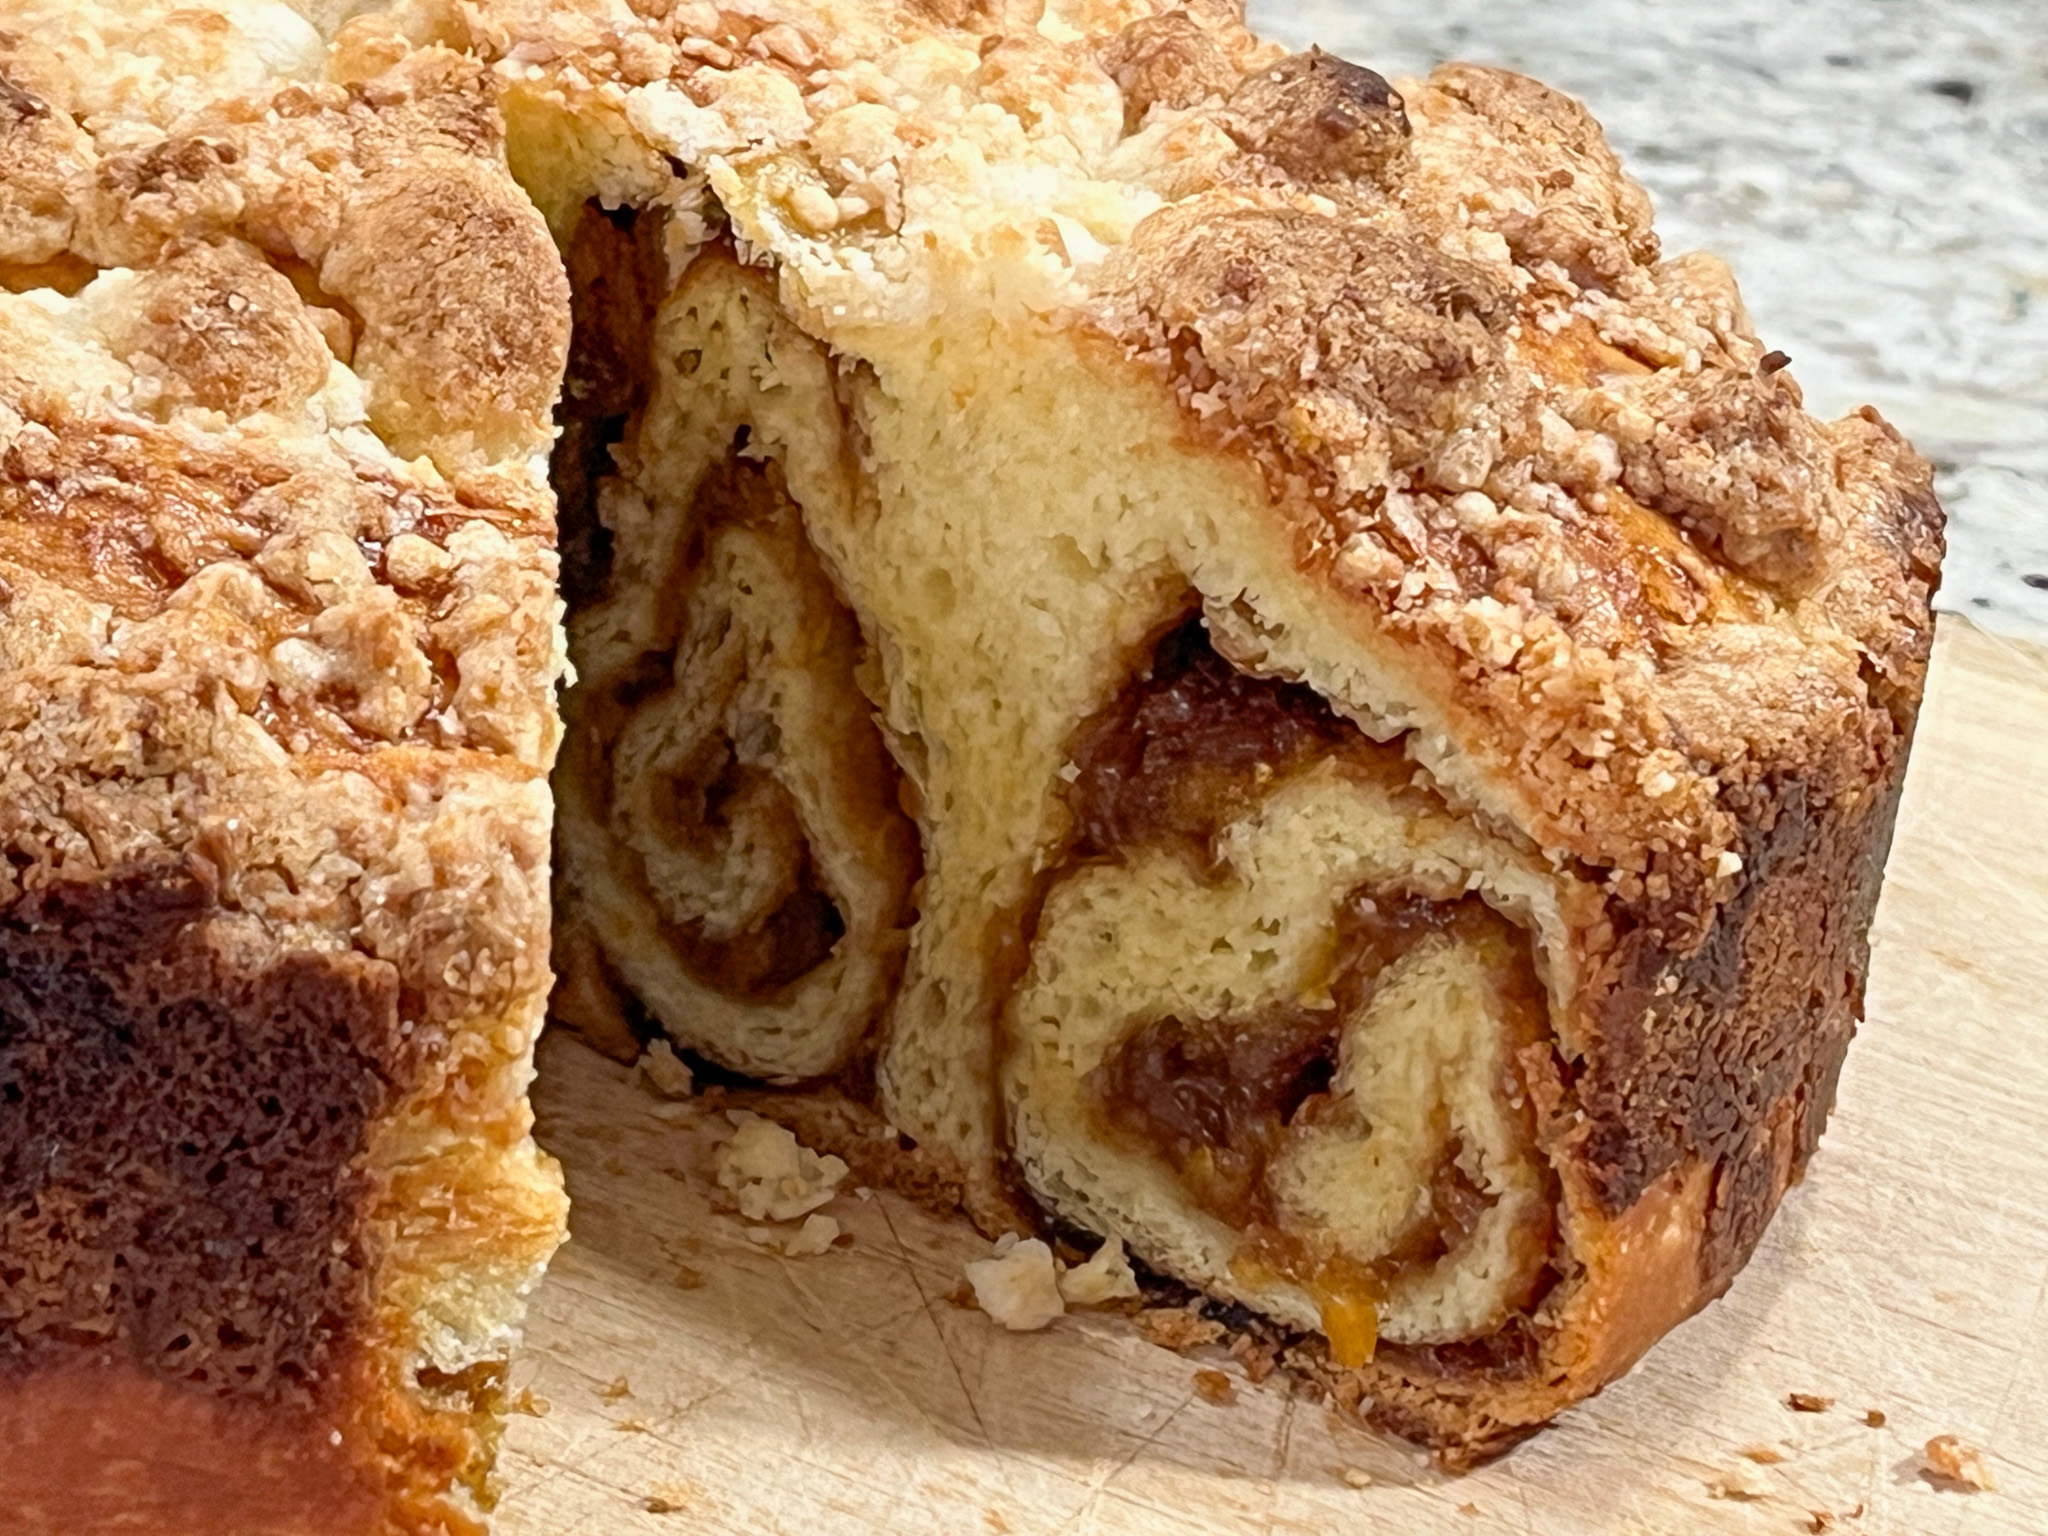
Is it a cake? Is it a sweet bread? Is it heaven on a plate? Yes to all! Another amazing recipe from Helen Fletcher, this is a bit involved but absolutely worth it… Slicing through it to reveal the coiled pattern inside is just too cool!

APRICOT CRUMBLE COFFEE CAKE
(from Helen Fletcher’s Pastries Like a Pro)
¾ cup unsalted butter (170 grams)
1 teaspoon active dry yeast
3 tablespoons warm water
Pinch granulated sugar
2 ¼ cup bread flour (315 grams)
1 ½ tablespoons granulated sugar
½ teaspoon salt
3 large eggs, room temperature
¼ cup half and half (or heavy cream)
Filling
¾ pound dried apricots
1 cup water
5 tablespoons butter (75 grams)
½ cup powdered sugar (65 grams)
1 ½ teapoons vanilla
2 teaspoons cocoa
Almond Paste Crumb Topping
1 cup cake flour (125 grams)
½ cup almond paste (125 grams)
⅔ cup granulated sugar (130 grams)
½ cup unsalted butter (114 grams)
Assembly
1 large egg, well beaten
Make the brioche dough: Cut the butter into small pieces by cutting the stick in half lengthwise, the cutting it into half inch pieces. Place it back in the refrigerator to keep cold. Make a sponge by dissolving the yeast and pinch of granulated sugar in the 3 tablespoons warm water. Add 3 tablespoons flour from the measured amount of 2 ¼ cups flour. Stir together to completely mix the ingredients. Cover with film and set aside to double or more while preparing the rest of the ingredients.
In the processor bowl fitted with the steel blade, place the remaining flour, salt and sugar. Process 5 seconds to mix. Place the cold butter in a circle over the flour. Process the butter until it is indistinguishable, about 20 seconds. Scrape down and process about 5 seconds more.
Place the eggs in a circle over the dry ingredients, pour the half and half or cream over the eggs, and add the sponge, also in a circle. Process approximately 20 to 25 seconds until the ball which initially forms breaks down into a creamy, evenly dispersed batter in the processor bowl. Do not stop processing until the batter is formed, as the motor may stall when you try to restart it. If the ball doesn’t break down, that’s fine as long as everything is mixed well.
Remove from the processor bowl and place in an ungreased bowl. Cover securely with plastic wrap and allow to rise until double in bulk about 2 to 2 ½ hours. Stir down and refrigerate overnight. Punch down and use as directed. It can stay in the refrigerator for up to 3 days before using.
for the filling:
Place the apricots and water in a small saucepan and bring to a boil. Reduce to a simmer and, stir frequently until most of the water is gone. Place the apricots and remaining ingredients, except the cocoa, in a processor bowl and process until smooth. Set aside to cool. Stir the cocoa in. This may be made a week ahead and stored in the refrigerator. Remove to room temperature before using.
for the crumb topping:
Place the flour and almond paste (either home made or bought) in the bowl of a processor. Process until the almond paste is indistinguishable. Add the sugar and butter and process until it begins to form crumbs. Switch to pulses and pulse only until large crumbs form. Remove them to a bowl and refrigerate until needed.
To assemble the coffee cake:
Spray a 9×3″ cheesecake or springform pan with a non-stick baking spray. Set aside.
Remove the brioche from the refrigerator, punch down, pat into a rectangle on a lightly floured surface and roll into a 20×11 inch rectangle so the long horizontally in front of you to make rolling up easier.
Spread the filling evenly over the brioche within ½” of the edges. Roll up tightly from the 20″side and pinch the seam securely together. Roll and gently stretch it until it is 30″ long. If it is very soft at this time, coil it up on a parchment line baking sheet and chill to firm up. Do not let it freeze.
Starting in the middle of the pan, coil the roll around towards the outer edge of the pan. Press it down to flatten and fill the pan. Cover with a towel and let rise until doubled in bulk. Because everything is cold, this could take 4 to 4 ½ hours to rise.
Heat the oven to 375F. When the coffee cake is full risen, brush it with the beaten egg and distribute the almond paste crumbs evenly over the brioche. Bake for 45 to 55 minutes until the top is browned. A tester is difficult here because the filling stays moist and clings to the tester. If the top begins to brown too quickly, tent it with foil. Cool until barely warm and release the cake. Dust with powdered sugar to serve.
ENJOY!
to print the recipe, click here
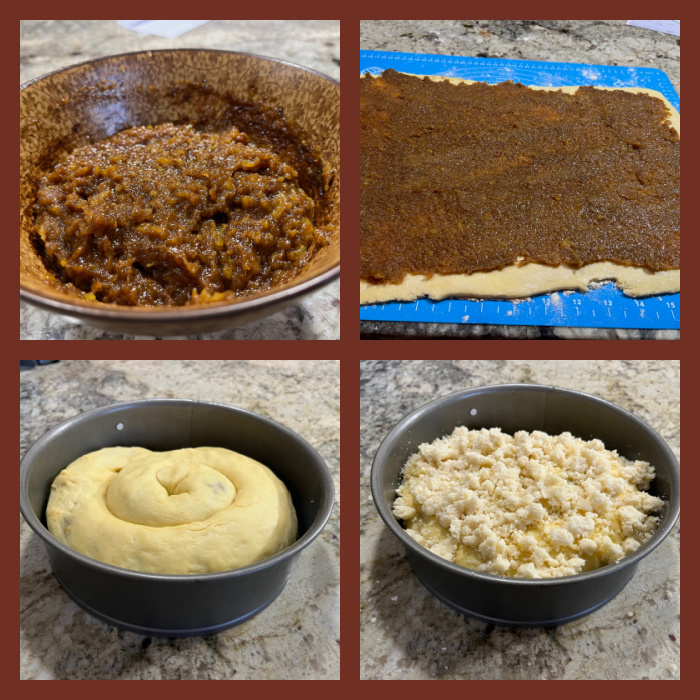
Comments: Helen’s method to make a brioche in the food processor is something I’ve been meaning to try for the longest time, and it works so well, I will keep it as my method of choice from now on. It considerably speeds up the preparation of the dough, and you cannot beat the texture. A pleasure to work with. I could have done a better job keeping the coil leveled on all sides of the pan, if you look at the bottom left photo of the composite above, you’ll see that my coil got a bit lopsided. Other than that, no issues. I highly recommend you visit Helen’s site (click here) because she goes over every little step with pictures and you get a better idea of what to expect as you make this recipe.
The crumb topping is irresistible, so I advise you to stop nibbling on it and use it exclusively to top the cake. I made my own almond paste, following Helen’s detailed recipe, and it turned out perfect! I used her simple syrup method. You can read her post about it clicking here. My little concoction looked exactly like hers – or the ones you can buy at the store – but my picture was badly out of focus, so you will have to take my word for it. I loved making this crumb cake, now I dream of variations, maybe some black sesame paste in the filling could be fantastic also!

ONE YEAR AGO: Hawaij, Three Ways
TWO YEARS AGO: A Most Painful Goodbye
THREE YEARS AGO: Masala Clay Pot Chicken Thighs
FOUR YEARS AGO: Happy Swirls Tonka Macarons
FIVE YEARS AGO: Chocolate Tartlets with Honey-Caramel Filling
SIX YEAR AGO: Zucchini Soup with Tahini
SEVEN YEARS AGO: Black Sesame Macarons
EIGHT YEARS AGO: Fine Tuning Thomas Keller
NINE YEARS AGO: Cauliflower Tortillas
TEN YEARS AGO: Majestic Sedona, Take Two
ELEVEN YEARS AGO: Secret Ingredient Turkey Meatballs
TWELVE YEARS AGO: Swedish Meatballs and Egg Noodles
THIRTEEN YEARS AGO: Italian Easter Pie
FOURTEEN YEARS AGO: Black Olive Bialy
My cookie ravioli fiasco left me staring at the mold and wondering if that impulse buy was going to sit in a drawer neglected for eternity months. No, that could not possibly happen. To counteract the bad taste in my mouth, I jumped on another crazy adventure right away: making ravioli from scratch, but adding a little twist to the whole thing. The pasta dough would have two colors. I’ve made pasta from scratch a few times, it is a messy process but quite gratifying. I am overjoyed to report that my mental sanity was not badly affected and we had a very delicious dinner that Saturday night…

BICOLOR RAVIOLI WITH MUSHROOM-ALMOND FILLING
(from The Bewitching Kitchen, filling inspired by this post)
white dough:
125g all-purpose flour
75g semolina flour
2 eggs
pinch of salt
red dough:
125g all-purpose flour
75g semolina flour
50g cooked beets (I used canned, slivered)
2 tsp paprika
2 eggs
for the filling:
8 ounces (226g) mushrooms, finely chopped
2 tablespoons olive oil
1 cup (142g) almonds
½ cup (112g) water
1 teaspoon (6g) sea salt
1 teaspoon lemon juice
The day before you want to make ravioli, prepare the filling.
Fill a medium sized saucepan with 1 cup (142g) of almonds and enough water to cover the almonds. Turn the heat to high. Once it starts to boil, turn the heat down, boil the almonds for 15 minutes, then pour the almonds and water into a colander. Rinse them well. Sauté chopped mushrooms in 1-2 tablespoons of olive oil until all the liquid has cooked out.
Blend the boiled almonds, salt, lemon juice and water in a blender or food processor until a paste forms. Add the mushrooms and blend a few more times so that they are in very small pieces. Transfer the filling to a colander sitting on a bowl and let it drain for several hours in the fridge, then cover and store it in the fridge until needed. You can do this a couple of days in advance.
Make the white pasta. Add both flours and salt to the food processor, mix for a few seconds. Add the 2 eggs and process until a dough ball forms. If too dry, add water. If too loose, add flour. Remove the dough from the processor, form into a disc, wrap in plastic and let it rest at room temperature for 1 hour.
Make the red dough. Add the eggs, beets and paprika to the food processor and process until smooth. Add the flours and salt, process until a dough ball forms. You will probably need to add more flour to this dough. Reserve at room temperature like you did for the white dough.
Cut the pasta dough in three equal parts, and roll them several times in the widest setting of your roller. Try to go for a nice rectangle shape. Do the same for the colored dough. Cut stripes in both colors or just one if you prefer to use the second method. Carefully roll the bicolor dough to the desired level, I stopped at setting #3. Lay the pasta on the mold, add the filling and close the ravioli. Once they are made, sprinkle a little flour and freeze until cooking time.
Simmer them gently for about 4 minutes then add the sauce of your choice to serve. I used just a little olive oil, lemon, parsley and water from cooking the ravioli. Serve immediately.
ENJOY!
to print the recipe, click here

Comments: These are the tips I consider most important. First, make the filling one day before, so that it is super cold and you do take the time to cook most of the moisture out. That will avoid minimize risks of failure when you form and cook the ravioli. Second, be ready to either cook the ravioli right after you make it, or freeze them right away with a light coating of flour. Considering that making pasta from scratch it is a bit of a messy process, I rather make them earlier in the day, clean the kitchen, and cook them later.

There are two different ways to make the striped pattern. You can roll the pasta through the widest setting of your roller, then cut strips and join them side by side. That is shown in the photo below, to the left. The problem with that method, is that sometimes the strands will not join tightly enough and when you pass the sheet through the roller to make it thinner, they will separate. It is maddening. It worked well on the first set I made, but the second one was almost totally ruined. I had enough pasta dough to try one more time, and used the second method. In this case, one sheet of pasta is kept whole, and the other used to make stripes, that are laid on top of the first. It is shown below, on the right side of the panel.

I really favor the second method, which is also nice to make other patterns. Think polka dots, stars, squares… So many possibilities! Once you have the striped sheet ready, it will go through the thinner settings of the roller. You should end up with a beautiful concoction waiting for the filling… I was afraid to roll it too thin and have it burst with the filling, maybe next time I can take it through one more setting.

The mold worked super well to fill and form the ravioli…

The ravioli must be cooked in water that is brought to a full boil but kept simmering because fresh pasta is so delicate…

For my next adventure, my goal is to get a darker red pasta, so I will use more beets and maybe also add beet powder. Or maybe I will go for green with spinach, black with charcoal powder. Whatever color combination, I intend to make the strips thinner so that I will have more stripes per ravioli. Stay tuned!

ONE YEAR AGO: Crispy Asparagus Salad with Toasted Bread Crumbs
TWO YEARS AGO: Low-Carb Super Fast Chicken Parmigiana
THREE YEARS AGO: Sundried Tomato Spelt Sourdough
FOUR YEARS AGO: A Duet of Chocolate Bonbons
FIVE YEARS AGO: Chocolate Tartlets with Honey-Caramel Filling
SIX YEAR AGO: Zucchini Soup with Tahini
SEVEN YEARS AGO: Black Sesame Macarons
EIGHT YEARS AGO: Fine Tuning Thomas Keller
NINE YEARS AGO: Cauliflower Tortillas
TEN YEARS AGO: Majestic Sedona, Take Two
ELEVEN YEARS AGO: Secret Ingredient Turkey Meatballs
TWELVE YEARS AGO: Swedish Meatballs and Egg Noodles
THIRTEEN YEARS AGO: Italian Easter Pie
FOURTEEN YEARS AGO: Black Olive Bialy

The path is not only short, but also pretty messy. You’ve been warned. For a very long time I’ve flirted with the idea of making a stuffed cookie in the shape of a ravioli, inspired by a gorgeous version from Helen Fletcher’s book Craving Cookies, the Quintessential American Cookie Book. She cuts hers by hand, after enclosing a square of chocolate between two sheets of dough. I decided I was going to impress her (cough, cough) with a different twist: using a ravioli press. What could possibly go wrong? I was so excited about my project that I had already a blog post shaping up in my mind. So, first things first, I took a nice picture of the weapons used in the crime.

I dreamed about my blog post going viral, even if in almost 15 years of blogging nothing has ever came close to it. In fact, viruses avoid me so much that even Covid stays safely away. Still a unicorn after all these pandemic years. Anyhow, I digress. Here is the full outcome of 420g flour, 340g butter, and a good amount of sugar to boot.
Six. Cookies. Six. Half a dozen.

The composite picture below shows the steps right before chaos. In theory, you roll the cookie dough, lay on the mold, add your filling, close with another cookie sheet, smooth everything with the cute rolling pin provided. For the square ravioli, I used Peppermint Bark, cut in four small pieces. They fit so nicely in the allotted space! But that was the last reason I would have to smile for a while…

From that point, all hell broke loose and broke loose with bangs of profanity. The cookie dough glued to the mold in perverse ways, I used every trick imaginable, including freezing the whole thing for increasing periods of time. The bond between dough and mold was likely approaching triple-covalent level. I also tried gently probing with a tiny spatula. I don’t recommend doing that. Ever.
All I could do was try again with the second mold, the round one, using a heavier hand with the flour. I opted for Nutella for the filling, which was another bad decision, as it squirted everywhere as I tried to roll the ravioli shut. Messy, sticky, horrific. I managed to get six severely abused cookies from the adventure, and thanks to the miracle of Royal icing and sprinkles they were able to make a public appearance. It is a good thing you cannot see their bottoms (enough said).

Sooooo, what did I learn from this fiasco? I firmly believe that this could be a PERFECT Technical Challenge for a certain tent… Here’s how to do it: give a list of ingredients to the poor contestants. The instructions should be kept simple:
Make a cookie dough.
Use the ravioli press to make filled cookies.
As to the filling, they can use their tears and frustration. They shall have plenty to take care of all 10 cookies in the mold. So, there you go, organizers of Great British and Great American Baking Show. Free advice to guarantee great entertainment for your audience…

I shall be back, friends! I lost a battle but this war is NOT over! I shall make Helen proud!
ONE YEAR AGO: Peanut Butter and Jelly Babka and a Cookbook Review
TWO YEARS AGO: Painted Sourdough
THREE YEARS AGO: Over-the-Moon Blueberry Lemon Macarons
FOUR YEARS AGO: Springtime Macarons Bake-Along
FIVE YEARS AGO: Macarons for a Little Princess
SIX YEARS AGO: Gilding the Sourdough Loaf
SEVEN YEARS AGO: Lolita Joins the Bewitching Kitchen
EIGHT YEARS AGO: Cashew Cream Sauce
NINE YEARS AGO: Blood Orange Margaritas
TEN YEARS AGO: Smoked Salmon Appetizer
ELEVEN YEARS AGO: Clementine Cake
TWELVE YEARS AGO: Springtime Spinach Risotto
THIRTEEN YEARS AGO: The end of green bean cruelty
FOURTEEN YEARS AGO: Torta di Limone e Mandorle
